Unity 2D Animation with Mecanim
Unity comes with a very rich and powerful animation system called “Mecanim”. Some of its features include retargetable animations, full control of animation weights at runtime, event calling from within the animation playback, sophisticated state machine hierarchies and transitions, blend trees and much more. Something I particularly like about this system is the possibility of animating almost any GameObject property. In this post, I’ll present a technique I used in a game I’m developing, focusing specially in 2D animation. Please note that the version of Unity used for this post is version 5.6.1f1 running on Windows 10.
Animation Components
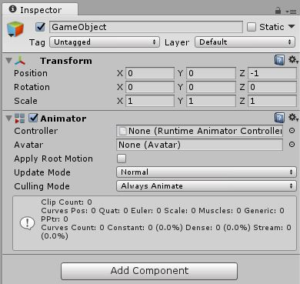
First, lets explain what are the necessary components for an animation. First, you need to have an Animator Component attached to the GameObject you want to animate. From Unity’s own definition, the Animator Component is a:
Component on a model that animates that model using the Animation system. The component has a reference to an Animator Controller asset that controls the animation.
You can add an Animator Component in the Editor by selecting the object you want to animate, and in the Inspector select Add Component -> Animator.
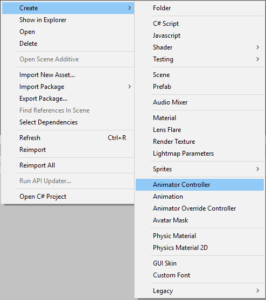
As mentioned in the definition, the Animator requires an Animator Controller to control the animation. In the Project window, right-click and select Create -> Animator Controller.
Once created, double click on the Animator Controller asset or select Window -> Animator to show the Animator window.
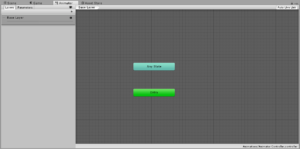
The controller has references to the animation clips used within it, and manages the various animation states and the transitions between them using a so-called State Machine
By default, the Animator Controller has two states: Any State and Entry.
Remember to add the reference of the newly created Animatior Controller to the Animator.
Finally, we need to create the Animation Clip asset. We can do this in several ways, using the right-click menu or using the Animation window.
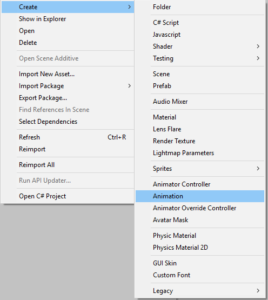
To show the Animation window, select Window -> Animation or press Ctrl+6.
In the Hierarchy window, select the GameObject you want to animate and click on the Create button in the Animation window. This will create a new state in the Animator Controller with a reference to the Animation clip we created. New states can be created by right-clicking on the Animator Controller window and selecting Create State -> Empty. The default state will have an orange color, while the rest will have a grey color. Notice also, the arrow pointing to the states. This is how we define the transitions between states.

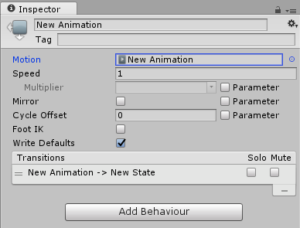
Make sure the Animation state has a reference to the correct Animation clip by left-clicking on the it and looking at the Inspector window. The Animation clip is referenced under Motion.
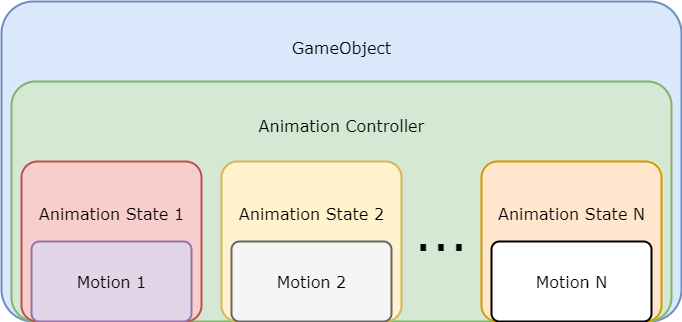
In summary, the basic components of an Animation in Unity are:
Bone-based Animation
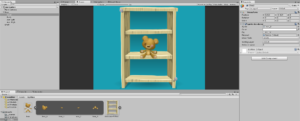
Let’s start by animating the property of a GameObject. Open Unity and create a new 2D project. For this project I used the image of a bookcase obtained through Pixabay but you can use any image you want. Add the image into the scene by dragging it a position you like. This image will act as the background.
In this section, I’ll be describing an animation technique called “Bone-based animation” or “Skeletal animation”. If you have never heard of this, Wikipedia provides the following definition:
Skeletal animation is a technique in computer animation in which a character (or other articulated object) is represented in two parts: a surface representation used to draw the character (called skin or mesh) and a hierarchical set of interconnected bones (called the skeleton or rig) used to animate (pose and keyframe) the mesh.
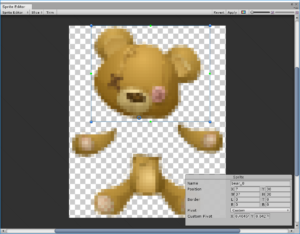
For the demo, I’m using the image of a stuffed bear from Glitch The Game but you can use any image you want. Notice that the original image had to be edited to create the “bones” or the different pieces that make up the bear; this can be done using GIMP or any image editing software you prefer.
Add the image to your Unity project and using the Inspector Window, set the Sprite Mode to “Multiple”. Slice the image using Unity’s Sprite Editor and make sure to place the pivot for each slice in the correct position; the rotations and movements of each slice will be based on that:
- For the left arm, place the pivot on the top right corner
- For the right arm, place the pivot on the top left corner
- For the head, place the pivot in what would be the “neck” of the bear, just below the chin and a little to the right
- For the body, place the pivot in the center
Now, add an empty GameObject in the scene and call it “Bear”. This will be the root of the object to be animated. Next, create a child GameObject for each component of the bear: the head, the right arm, the left arm and the body. In each one, add a Sprite Renderer component and assign the correct “bone” to the Sprite value. The end result should be something similar to this:
Time to add some animations! Add an Animator component to the “Bear” (the root object) and create an Animator Controller by selecting Assets -> Create -> Animator Controller. Name the Animator Controller as “BearAnimation” and assign it to the Controller in the Animator component.
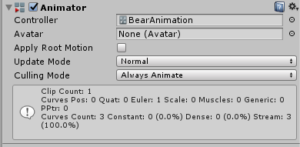
Display the Animation Window as explained above and select the “Bear” in the hierarchy. The Animation Window should display a button to create an Animation Clip. Click it. Name the Animation Clip as “BearIdle”. Notice that next to the name of the Animation Clip is an editable property called “Samples”. This is the number of frames per second of the animation. The default is set at 60 FPS, but in this case we want a slow animation, so we set this value to 15.
Click on the button to add a property to animate and select Head -> Transform -> Rotation.
Notice that next to the Sample rate there is a button to add a Keyframe to the animation.
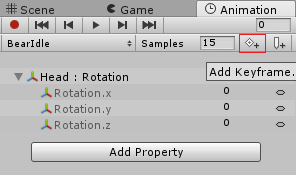
Select the position 1:00 in the Animation Timeline and then press the “Add Keyframe” button. Do the same for the position at 2:00. The numbers in the Timeline are shown as seconds and frames, so 1:30 means 1 second and 30 frames.

For the keyframe at position 1:00 set the Rotation.z value as 14 and for position 2:00 and 0:00 set it as 0. The end result should look like the following:
Congratulations! You just animated an object! There are features in Mecanim to create more complex animations but those will have to be addressed in following posts.
Until next time!