Show it to the World!
This is the first post of my (as of now) brand new website. As such, I was having trouble deciding what to put in here, but as luck would have it, the website itself gave me the answer: how to show your great games to the world!
One of Unity’s many virtues is its ability to be multi-platform: you can create your game once and with little effort, build it so it runs in a variety of consoles and operating systems.
To select the platform your game will run go to File -> Build Settings… and select the scenes to be added in your game. Once done, you should see a screen like the following:
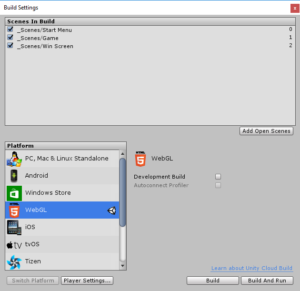
By default, it will select the platform you are currently running Unity on, but as you can see, we have selected WebGL. More information on how to build is available in the official documentation.
For those of you wondering what exactly WebGL is, the official definition is pretty straight forward:
WebGL (Web Graphics Library) is a JavaScript API for rendering interactive 3D and 2D graphics within any compatible web browser without the use of plug-ins. WebGL does so by introducing an API that closely conforms to OpenGL ES 2.0 that can be used in HTML5 <canvas> elements.
Basically, this allows us to use a browser to play our games, which is a pretty convenient way to publish and distribute it. Of course, there are websites specialized on hosting WebGL games. Some options are:
I have not used any of these services myself, so I cannot comment on any of those sites. Since I wanted to keep all my projects in my website I had to look for a way to publish the games myself.
Back to the build process: once it finished, I ended up with the following files and folders:
- an index.html file which browsers can navigate to load the content
- a TemplateData folder which contains Unity’s default template assets
- a Build folder (in my case I chose a Release build, so that is the actual name of the folder) containing the output files
For more information on the files created by Unity, follow the link to the official documentation.
This website was created using WordPress, so I had to make sure that the solution I chose for publishing the games was compatible with the framework. After a quick Google search, I found a WordPress plugin called HoweScape Unity3d WebGL. This seemed to be a pretty nice solution but after a few tries I was not able to see my game playing in the webpage. Also, according to the details from the developer, the plugin depends on the version of Unity used to build the application, which in the long term, is not the best option.
Since the build process provides an index.html I decided to search for a way to use that file in a webpage generated by WordPress. To give me an idea of what was being done I looked at the source code of the file to try and replicate the functionality.

I decided to give AWS S3 a try. My idea was to use the S3 services as a storage for the files and then try to access them on a webpage in my site. Unfortunately, I encountered a little problem that a web developer might have spotted already: CORS or HTTP access control.
The Cross-Origin Resource Sharing (CORS) mechanism gives web servers cross-domain access controls, which enable secure cross-domain data transfers. Modern browsers use CORS in an API container – such as XMLHttpRequest or Fetch – to mitigate risks of cross-origin HTTP requests.
In the browser logs I kept getting the following error:
No 'Access-Control-Allow-Origin' header is present on the requested resource
In the end, I decided to scrap my AWS S3 account and take a different route. Since my hosting service allows me to create sub-domains, I created one specifically for storing game data. Once the sub-domain was created, I simply transferred the Release folder and the index.html into a folder named after my game using FTP. Finally, in the WordPress generated page, I added the following code:
<iframe src="http://subdomain.domain/gameName/index.html" width="1024" height="640" align="center"></iframe>
Where subdomain is the name of the created sub-domain, domain is the full domain name and gameName is the folder created where the data files of the game will be stored.
In HTML, iframe is used to embed a document within the current document.
And there you have it! Now, you too can share your games to the rest of the World!
Until next time!